
单点登录服务Authelia(下篇)

高级设置

Authelia

进入 Nginx Proxy Manager,找到 Authelia 域名 auth.laosu.ml 对应的 Proxy Hosts,进入编辑状态,并切换到 Advanced 界面

在 Custom Nginx Configuration 中粘贴下面的代码

1
2
3
4
5
6
7
8
9
10
11
12
13
14
15
16
17
18
19
20
21
22
23
24
25
26
27
28
29
30
31
32
33
location / {
set $upstream_authelia http://192.168.0.199:9091; # authelia 的 ip 和端口
proxy_pass $upstream_authelia;
client_body_buffer_size 128k;

#Timeout if the real server is dead
proxy_next_upstream error timeout invalid_header http_500 http_502 http_503;

# Advanced Proxy Config
send_timeout 5m;
proxy_read_timeout 360;
proxy_send_timeout 360;
proxy_connect_timeout 360;

# Basic Proxy Config
proxy_set_header Host $http_host; # 原为 $host,按照作者建议改为 $http_host;
proxy_set_header X-Real-IP $remote_addr;
proxy_set_header X-Forwarded-For $proxy_add_x_forwarded_for;
proxy_set_header X-Forwarded-Proto $scheme;
proxy_set_header X-Forwarded-Host $host;
proxy_set_header X-Forwarded-Uri $request_uri;
proxy_set_header X-Forwarded-Ssl on;
proxy_redirect http:// $scheme://;
proxy_http_version 1.1;
proxy_set_header Connection "";
proxy_cache_bypass $cookie_session;
proxy_no_cache $cookie_session;
proxy_buffers 64 256k;

set_real_ip_from 192.168.0.0/24; #根据你的网段进行修改
real_ip_header X-Forwarded-For;
real_ip_recursive on;
}

粘贴前有两处需要修改👇

  • 第一处要改成你的群晖主机的 IP 和 Authelia 的端口
1
set $upstream_authelia http://192.168.0.199:9091; 
  • 第二处根据你的网段进行修改
1
set_real_ip_from 192.168.0.0/24; #根据你的网段进行修改

受保护的域

域名 用途 规则
https://ad.laosu.ml Adminer 的访问地址 one_factor
https://sp1.laosu.ml speed test 的访问地址 one_factor
https://nas.laosu.ml 群晖管理界面 的访问地址 two_factor
https://n8n.laosu.ml n8n 的访问地址 two_factor

每个受保护的域,不管是 one_factor 还是 two_factor,都要进入 Nginx Proxy Manager,找到对应的 Proxy Hosts,进入编辑状态,并切换到 Advanced 界面,在 Custom Nginx Configuration 中粘贴下面的代码

1
2
3
4
5
6
7
8
9
10
11
12
13
14
15
16
17
18
19
20
21
22
23
24
25
26
27
28
29
30
31
32
33
34
35
36
37
38
39
40
41
42
43
44
45
46
47
48
49
50
51
52
53
54
55
56
57
58
59
60
61
62
63
64
65
66
67
68
69
70
location /authelia {
internal;
set $upstream_authelia http://192.168.0.199:9091/api/verify; # authelia 的 ip 和端口
proxy_pass_request_body off;
proxy_pass $upstream_authelia;
proxy_set_header Content-Length "";

# Timeout if the real server is dead
proxy_next_upstream error timeout invalid_header http_500 http_502 http_503;
client_body_buffer_size 128k;
proxy_set_header Host $http_host;
proxy_set_header X-Original-URL $scheme://$http_host$request_uri;
proxy_set_header X-Real-IP $remote_addr;
proxy_set_header X-Forwarded-For $remote_addr;
proxy_set_header X-Forwarded-Proto $scheme;
proxy_set_header X-Forwarded-Host $http_host;
proxy_set_header X-Forwarded-Uri $request_uri;
proxy_set_header X-Forwarded-Ssl on;
proxy_redirect http:// $scheme://;
proxy_http_version 1.1;
proxy_set_header Connection "";
proxy_cache_bypass $cookie_session;
proxy_no_cache $cookie_session;
proxy_buffers 4 32k;

send_timeout 5m;
proxy_read_timeout 240;
proxy_send_timeout 240;
proxy_connect_timeout 240;
}

location / {
set $upstream_speedtest http://192.168.0.199:8180; # 更改应用的名称, IP 和端口
proxy_pass $upstream_speedtest; # 更改应用的名称,一般可以用 upstream_应用名称 的方式

auth_request /authelia;
auth_request_set $target_url $scheme://$http_host$request_uri;
auth_request_set $user $upstream_http_remote_user;
auth_request_set $groups $upstream_http_remote_groups;
proxy_set_header Remote-User $user;
proxy_set_header Remote-Groups $groups;
error_page 401 =302 https://auth.laosu.ml:444/?rd=$target_url; # 改为你的 authelia 域名,有端口也要带上

client_body_buffer_size 128k;

proxy_next_upstream error timeout invalid_header http_500 http_502 http_503;

send_timeout 5m;
proxy_read_timeout 360;
proxy_send_timeout 360;
proxy_connect_timeout 360;

proxy_set_header Host $http_host;
proxy_set_header X-Real-IP $remote_addr;
proxy_set_header X-Forwarded-For $proxy_add_x_forwarded_for;
proxy_set_header X-Forwarded-Proto $scheme;
proxy_set_header X-Forwarded-Host $http_host;
proxy_set_header X-Forwarded-Uri $request_uri;
proxy_set_header X-Forwarded-Ssl on;
proxy_redirect http:// $scheme://;
proxy_http_version 1.1;
proxy_set_header Connection "";
proxy_cache_bypass $cookie_session;
proxy_no_cache $cookie_session;
proxy_buffers 64 256k;

set_real_ip_from 192.168.0.0/16; #根据你的网段进行修改
real_ip_header X-Forwarded-For;
real_ip_recursive on;
}

粘贴前有几处需要修改👇

  • 第一处要改成你的群晖主机的 IP 和 Authelia 的端口
1
set $upstream_authelia http://192.168.0.199:9091/api/verify; # authelia 的 ip 和端口
  • 第二处是修改 $upstream_speedtest ,一般按照应用的名称、容器的名称改,主要是便于识别,例如:$upstream_adminer、 $upstream_n8n 等
  • 后面的地址 http://192.168.0.199:8180 则需要按照你的应用来设置,这是老苏安装的 speedtest 应用
1
2
set $upstream_speedtest http://192.168.0.199:8180;  # 更改应用的名称, IP 和端口
proxy_pass $upstream_speedtest; # 更改应用的名称,一般可以用 upstream_应用名称 的方式
  • 第三处需要改为你的 authelia 的域名,如果和老苏一样没有备案的话,这里必须把端口带上
1
error_page 401 =302 https://auth.laosu.ml:444/?rd=$target_url; # 改为你的 authelia 域名,有端口也要带上
  • 第四处根据你的网段进行修改
1
set_real_ip_from 192.168.0.0/16; #根据你的网段进行修改

运行

先打开 https://auth.laosu.ml:444,出现了 authelia 的登录界面

按照我们前面在 users_database.yml 中的设置,账号为 authelia,密码为 123456;这里老苏只是示例,如果你也这么设,那设不设的也没啥区别

登录成功后

如果设置了 two_factor,会显示需要注册设备

接下来试试 https://sp1.laosu.ml:444,出现了 authelia 的登录界面,输入账号、密码,登录成功直接打开了测试界面

打开 https://n8n.laosu.ml:444,这个通行规则是 two_factor,需要点 METHODS,选择 TOTP

点 Register device 可以注册设备

一次性密码(One-Time Password,简称 OTP),又称 “一次性口令”,是指只能使用一次的密码。一次性密码是根据专门算法、每隔 60 秒生成一个不可预测的随机数字组合,iKEY 一次性密码已在金融、电信、网游等领域被广泛应用,有效地保护了用户的安全。【百度百科】

OTP 软件挺多的,比如老苏用的 Microsoft Authenticator,还有 Google Authenticator 、 FreeOTP 等等

右上角显示发送邮件

进邮箱,点中间蓝色的 Register 按钮
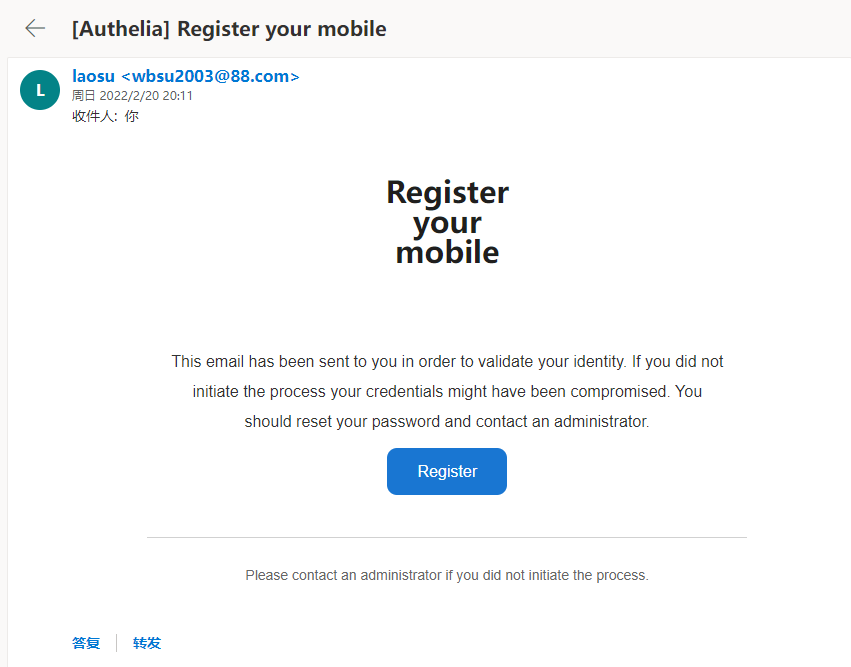
如果页面错误,看看 url 中是不是少了端口,老苏用的 444 端口是非标端口( SSL 默认端口为 443,所以老苏认为 444 是非标的),需要自己加,加好了在地址栏中直接回车刷新页面就可以了

按作者的说法,可能需要到 v4.34 才会修复非标准端口运行的问题

老苏用的是 Microsoft Authenticator ,打开后通过 添加账号 –> 个人账号 –> 扫描 QR 码

回到网页的登录界面,刷新后会显示 6 个方框

填入 Microsoft Authenticator 中的 6 位数字,验证通过后就可以看到 n8n 的界面了

结语

有了 Authelia,再配合 Fail2ban 防止暴力破解,公网访问的安全性问题会得到很大的保障。

虽然官方强调 OpenID Connect 仍处于预览阶段,但实际上Authelia 已经支持 OIDC 认证,不过限于篇幅,还是留到下回吧。

下期预告👉『Outline使用Authelia实现本地认证』,文章将讨论如何实现 Outline 通过 Authelia 的 OIDC 完成本地认证,而不再需要借助基于公网的第三方认证。

参考文档

authelia/authelia: The Single Sign-On Multi-Factor portal for web apps
地址:https://github.com/authelia/authelia

Home - Authelia
地址:https://www.authelia.com/docs/

Running authelia on a non standard HTTPs port. Base href is not valid. · Issue #2765 · authelia/authelia
地址:https://github.com/authelia/authelia/issues/2765

Authelia - SSO and 2FA portal
地址:https://www.blackvoid.club/authelia-sso-and-2fa-portal/

Self-Hosted SSO with Authelia and NGINX
地址:https://matwick.ca/authelia-nginx-sso/

Setup Authelia to work… | The Homelab Wiki
地址:https://thehomelab.wiki/books/dns-reverse-proxy/page/setup-authelia-to-work-with-nginx-proxy-manager

Authelia: Install Guide on Unraid + NGINX (Brief) - YouTube
地址:https://www.youtube.com/watch?app=desktop&v=fr-t7sGrYtI

SkyPi/README.md at main · Just5KY/SkyPi
地址:https://github.com/Just5KY/SkyPi/blob/main/Authelia/README.md